Saturday, December 25, 2010

Recording Skype into Garageband

I have been podcasting since late 2005 and I have been using Garageband since I first started. It works well and since a majority of the podcasts that I produce are just my voice, it is pretty straightforward to use.  
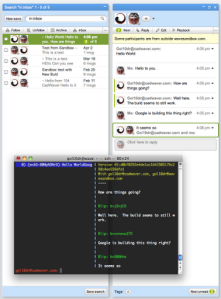
When I do occasionally have guests on the show, Skype has been the go to option and recording was always done with directly out of my computer and back into my mixer via a phono cable to XLR.  There was always a bit of feedback so here is how I grab the sound directly from Skype and dump it into Garageband into it's own track without the feedback.

My hardware:

Mic - Heil PR40 

My software:

Garageband - multi-track recording studio
Sound Flower - Free multi track virtual mixer
Line In - Audio passthrough device for routing an audio input to an output of your choice.
Skype - Audio/Video conference service

My Setup:

In order to do this without feedback (using an analog phono cable into my Fast Track Pro) I had to route each application correctly so the each party can hear and speak while recording my sound to track 1 and the Skype output to track 2.  So here is how you do it. (keep in mind you can substitute whatever source your mic and headphones are to work with your setup.).  The specifics are below but here is an outline of what we are doing:
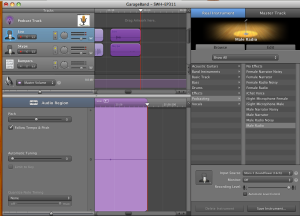
Bkjc7b1_garageband-skype

Garageband:

Preferences:
Screen_shot_2010-12-23_at_2

My Track: Make sure the track you record to is set to use SoundFlower 16ch since Skype will output stereo and use both channel 1&2 so the 2ch option will not work if you want to get both your Skype feed and your voice on separate channels. In my case I set my track to use Mono channel 3, which we will configure later in Line-In.
2screen_shot_2010-12-23_at_2
Skype Track: This track will be set to either Mono 1 or 2 since I only want mono and not stereo 1/2, although you could set it to that for stereo recording.  You will also want to turn on the Monitor so you will be able to hear that sound in your headphones.  I set mine to "No Feedback Protection" so I would not keep getting the warning.
1screen_shot_2010-12-23_at_2

Line-In Setup:
Screen_shot_2010-12-23_at_2

Advanced settings: Once you set where the sound will go, make sure you click on "Pass Thru" on the main Line-in screen.
Screen_shot_2010-12-23_at_2

Skype Setup:
4screen_shot_2010-12-23_at_2

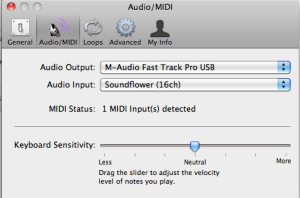
System Preferences (Mac):
Here you will set the input (your mic, in my case Fast Track Pro) and the output to where your headphones are (Fast Track Pro in my case)

Input:
3screen_shot_2010-12-23_at_2

Output:
0screen_shot_2010-12-23_at_2

Simple huh? Well a bit of a cluster but works well.  I might resort to going optical out into S/PDIF on the Fast Track Pro just to go digital from the source but this setup was free! ~Lou


Monday, November 22, 2010

Lock Down! Enable SSL on Apache2 with Signed Certificates

Ssl_login

Enabling SSL on Apache2 is actually pretty easy and out of the box will enable self-signed certificates.  This will suffice for testing but if your goal is to lock down sensitive information and be trusted by users, getting an SSL certificate for your domain will be key.  When I setup my FedOne server about a year ago, I had to go through getting certificates for federation to work with the Google's Sandbox.

Enable SSL in Apache2:

I am assuming you already have Apache2 installed and own a domain name with postmaster/webmaster access.  Here are the steps to get the SSL module of Apache2 running:

1 - Enable ssl:

$: a2enmod ssl

Out of the box this will use self-signed certiicates which will light up most broswers with a red "This site's security certificate is not trusted!".  The self-signed certificates are great for testing especially since Ubuntu 10.04 which contains it's own SSL conf file. 

2 -  Once the SSL is enabled, restart Apache:

$: sudo /etc/init.d/apache2 restart

Now that SSL is enabled and https://yourdomain.com is using the self signed certs, we need to generate a certificate request file and a private key from our server and use a 3rd party signer to get our certificate.  


Generate CSR and Server Key:

1 - I used the same script to generate both the private key and certificate request.

$: sudo nano make-csr.sh

2 - Enter the following code:

#!/bin/bash

NAME=$1

if [ "$NAME" == '' ]

then

echo "$0 " 1>&2

  exit 1

fi

openssl genrsa 2048 | openssl pkcs8 -topk8 -nocrypt -out $NAME.key

openssl req -new -nodes -sha1 -days 365 -key $NAME.key -out $NAME.csr

3 - Make the script executible:

er$: sudo chmod a+x make-csr.sh

3 - Run the script, adding the name you want on the end.  I choose "server":

$: sudo ./make-csr.sh server

This generated two files:

server.key
server.csr 

StartSSL™


Validate Domain with StartSSL:

I choose StartSSL since I used them during my FedOne setup and it was rather easy and free to boot.  Here are the steps:

1 - Go to http://www.startssl.com and create an account.  You will need to have a registered domain and access to the postmaster or webmaster of the domain in order to establish a certified connection.

2 - Click on "Sign-up" to begin the registration process.  This will have you fill out some information and will have you verify with an email.  Once verified a certificate will be installed in your browser (doesn't work on Chrome in my tests).

3 - Click on "Validations Wizard" and select "Domain Name Validation" (Continue)

4 - Type in your domain name (Continue).  An email verification will be sent and you will paste in the validation code to get your domain validated.

Request Certificate from StartSSL:

1 - Click on "Certificates Wizard" and for Certificate Target select "Web Server SSL/TLS Certificate (Continue)

2 - Click on Skip since we are going to use our own CSR from the above step (Skip)

3 - Copy the contents of the "server.csr" generated above by typing:

$: cat server.csr

* Make sure the contents of the certificate request includes the header and footers of the CSR with all the dashes! (Continue)

4 - The screen will appear with the contents of the newly generated SSL certificate.  Copy the contents and add it to a new file called "server.crt" on the server.

$: sudo nano server.crt

Configure Apache2 to use Signed Certificates:

I decided to create a directory to place my certificates in the Apache2 directory. You can place them anywhere you like.

1 - Make a directory in Apache2

$: sudo mkdir /etc/apache2/ssl

2 - Copy the certificate (server.csr) and private key (server.key) to the new directory

$: sudo cp server.crt /etc/apache2/ssl
$: sudo cp server.key /etc/apache2/ssl

3 - Point Apache to use your new files in the default-ssl file:

$: sudo nano /etc/apache2/sites-available/default-ssl

Make sure the SSL Engine is on and the proper paths are reflected:

SSLEngine On
SSLCertificateFile /etc/apache2/ssl/server.crt
SSLCertificateKeyFile /etc/apache2/ssl/server.key

4 - Restart Apache

$: sudo /etc/init.d/apache2 restart

Once restarted, Apache will now sign with your new certificates and users will see the green "https" in their browser bar.  Depending on what setup you require, you may need to still set your document root for your website and do a mod-rewrite in your .htaccess file to forward all your http traffic to https.

In my case, I was running my StatusNet instance with mixed mode SSL, protecting only sensitive pages since Meteor doesn't post via https yet without an unsupported proxy setup. ~Lou

Sunday, November 7, 2010

Google Boxes up Wave, Survival via Federation

Wiab
When Google announced that Wave would be shut down at the end of the year, I was extrememly disappointed since I believed in the movement of communication beyond email and all the other modes of collaboration.  For me, the saving grace was the announcement that Google would be working hard to build upon their open source FedOne project to incorporate all the the web UI that Google's own Wave had to date.  This new project is aptly named "Wave in a Box".

Back about a year ago, I went through the rigors of getting a FedOne Wave server installed.  Although the Wave Protocol had been released at Google I/O in May 2009, there was not much excitement without being able to federate with the development sandbox.  The other issue was nobody had access till the preview lauched, except in the sandbox, and all the invite hell that followed.

Once Google opened up federation on wavesandbox.com many of us started trying to run our own servers so we could test out this cool new federation protocol.  Most of the setup was pretty easy but certificates, which are required for federation with Google's Wave Sandbox, can be quite the ordeal to get working properly.  Without completely re-outlining every step, I thought I would outline my setup since I recently moved my wave setup to another server and had to walk thought the steps again, refreshing my memory.

Server OS: Ubuntu 10.10 Server:

1 - Get necessary packages to setup the Wave-in-a-box environment:

$: sudo apt-get install mercurial ant default-jdk mongodb eclipse 

NOTE: With Ubuntu 10.10 you need to get the repository for Java first:

 $: sudo add-apt-repository ppa:sun-java-community-team/sun-java6

 $: sudo apt-get update


2 - Get current Wave-in-a-Box source:

$: mkdir wave-development

$: cd wave-development

$: hg clone https://wave-protocol.googlecode.com/hg/ wave-protocol


3 - Build Wave-in-a-Box:

$: cd wave-protocol

$: sudo ant

Building Wave-in-a-Box is pretty straight forward however there are a few things to know if you intend to federate with other Wave-in-a-Box instances, especially when authentication is used.  Two major components, not mentioned above, are required to establish secure signing between servers and to allow some of the live collaboration. You will need to install an XMPP server and have your certificates built for the domain you are going to use for federation.  I also needed to add a few things to my host file and setup SRV records on my domain registrar to get all to work correctly.

Below are some links to help you in getting all of Wave-in--Box setup and working:

Setup: http://www.waveprotocol.org/wave-in-a-box/setting-up

Building: http://www.waveprotocol.org/wave-in-a-box/building-wave-in-a-box

Installation: http://www.waveprotocol.org/code/installation

XMPP step by step (Openfire): http://www.waveprotocol.org/federation/openfire-installation

Federation Certificates: http://www.waveprotocol.org/federation/certificates

Certificate Issuer: http://www.startssl.com/

A great step by step by Ralf Rottman: http://www.24100.net/2009/11/federate-google-wave-sandbox-with-your-own-fedone-server/

Once you are setup you can start trying out your newly, self-hosted Wave server. WiaB comes with two client interfaces.  The first is a terminal client located in the "wave-protocol" directory which can be used by typing:

./run-console-client.sh <username>  

Once inside you can type "/help" to see the available commands.

The other interface is web-based and works rather well.  This is the area that is under major development to bring it to parity with Google Wave's web UI.  By default it is accessible on port 9898 so you can access it by visiting http:/yourdomain.com:9898.  

Currently Federation is only open on other WiaB instances in which it is enabled and the developers sandbox at http://wavesandbox.com.  If you just want to try to set WiaB without federation, certificates and XMPP servers are not necessary.  You can then setup the server and install and build the source and run the server.  There is currently a config file for no federation that will allow you to test out the web UI quickly with very little headache.  Federation is key to the success of this platform in the long run so if you are serious about sustaining a Wave server, get federation running too! ~Lou

A Few Images:

Wiab_web_welcomeWiab_web_uiWiab-terminal

If you have questions or run into any issues, please leave a comment or send me a message:

Twitter: @gol10dr

Wave: gol10dr@googlewave.com

Monday, October 25, 2010

Customizing Ubuntu's SSH MOTD

Ubuntu_10
I recently updated my Ubuntu server from 10.04 LTS to 10.10 and towards the end of the update process a prompt is displayed requesting for removal of obsolete packages with the options yes/no/details. I decided to check the details screen and accidentally exited, killing the installer and not completing the removal of these packages.  (you can resume this with apt-get...)

Since this abrupt exit of my update process, my SSH MOTD (message of the day) which, by default displays the landscape sysinfo and available updates was static. Now every time I would SSH into the server, the login sysinfo was always the same and it showed that I had 311 updates that running and apt-get update then upgrade would yield no such update.  It also kept telling me that an update was required even though a reboot file was not present in:

/var/run/reboot-required

There are a couple of files that need to be changed in order to correct this static message. The first, which you should not edit but can clear since it is overwritten is located at:

/etc/motd

This file is updated with the MOTD info but removal of anything here will simply get rewritten with  updated infomation and anything located in the "tail" file.   Editing the MOTD tail will append the info pushed to /etc/motd.  Upon editing:

/etc/motd.tail

In my case the /etc/motd.tail contained the same static message that I was seeing in my SSH session. Clearing this or adding your own custom message will now display your correct landscape sysinfo and you new custom "tail" content. 

Note - If you clear the tail and reboot and immediately log in via SSH, you might receive a message saying "System information disabled due to load higher than 1" so wait about 10 minutes before logging in to see if you new MOTD will display correctly.  

You can also display the same welcome landscape sysinfo by running he following command:

/usr/bin/landscape-sysinfo


UPDATE:

Another thing I noticed is that my update-notifier module has somehow been removed so if you are noticing that your update notification from MOTD is not showing up, ensure that update-notifier in installed.

Saturday, October 2, 2010

Web App Navigation with Apache Aliases

Apache_software_foundation_logo_3074
This past week I installed ThinkUp, the open source creation by Gina Trapani, sponsored by Expert Labs and used by the White House to get statistics from various social networks like Twitter and Facebook.  The web application is very easy to install due to the nice web installer interface.  If you are interested in installing it yourself, you can follow the instructions here.

All the ThinkUp web app needed was to be dropped in a folder accessable from your website, given write access and have an empty mysql database and user to specify for the setup.  The easy way would be to create a folder in your root directory so you could access it by going to:

http://yourdomainname.com/webapp

In my case my Apache root is set to my StatusNet instance in my www root (ie. /var/www/statusnet) and I didn't want to place the ThinkUp app folder in my "statusnet" folder due to it messing with my upgrade workflow for StatusNet.

I opted to create a folder in my www root for Thinkup (/var/www/thinkupfolder) but since Apache's root was set to /var/www/statusnet, I needed to create a shortcut to this location. To do this I used an alias.  With your favorite editor edit:

/etc/apache2/sites-available/default

Add the following:

Alias /webapp /var/www/webapp/
<Directory /var/www/webapp>
Options Indexes MultiViews
AllowOverride All
Order allow,deny
Allow from all
</Directory>

You can visit Apache's site to learn how to restrict access and add other controls as well. Now you can keep your web apps separate but still access them from your domain root as a sub directory! ~Lou


Friday, September 24, 2010

Meteor showers Live StatusNet Updates

Screen_shot_2010-09-24_at_12
If you are a regular visitor to sites like Twitter or FriendFeed (not via a client) you may notice how these sites update as new feeds come in without requiring you to reload the webpage.  This type of behavior is delivered via technologies like Meteor.

StatusNet, the open source microblogging platform I use, supports a number of technologies within their plugin architecture, one of which is Meteor.  Only having a single server (for now) hosting my StatusNet site, I wanted to get Meteor running and coincide with Apache.  Since they both want to play in the HTTP playground known better was port 80, I needed to reconfigure Meteor to run.

Meteor Configuration:

- Follow all the setup instructions from the Meteor site.

- Before RUNNING Meteor you need to change Meteor's Config.pm to avoid colliding with Apache on port 80. (for example 8085 instead of 80)

Modifications:

- Edit /usr/local/meteor/Meteor/Config.pm to match the following:

  1. ControllerIP => '127.0.0.1', (This is empty by default, leave the port to 4671)
  2. SubscriberIP => 'ip.of.your.statusnet', (I used the IP of my domain name)
  3. SubscriberPort => '8085', (This is my example port mentioned above)

- An additional change was made to the meteor.js file to reflect my new port specification (8085 in our example)

Modifications:

  1. port: 8085 

- Run Meteor in the background, however in Ubuntu you will need to modify the "Meteord" file first.  This is detailed on step 3 in the Meteor installation site since they test in Fedora. (Also make sure /etc/init.d/meteord is set to executable (chmod +x meteord)

sudo /etc/init.d/meteord start

NOTE: You can also check that Meteor is running by running the following command:

sudo netstat -plunt

Home

 StatusNet Configuration:

Since StatusNet has an extensive plugin framework, adding technologies like Meteor is a snap!  A few lines in your Config.php and realtime will be live!  Here are the steps: (using our 8085 port)

  1. Edit your Config.php
  2. Add the Plugin: (this will communicate with your Meteor server and add the play/pause buttons to the top of your site's timeline)

addPlugin('Meteor', array('webserver' => 'yourdomain.com', 'webport' => '8085', 'controlserver' => '127.0.0.1', 'controlport' => '4671'));

      3. Release the daemons!
scripts/startdaemons.sh
NOTE: Depending on what plugins you have enabled a number of daemons will be launched.  If you have the daemons already running, you will need to stop and restart them: (from StatusNet instance root)
scripts/stopdaemons.sh
I have noticed that the queuedaemon typically doesn't get killed with the above script so I have manually killed it and relaunched. Usually I just look up the PID and kill it:
ps aux
sudo kill PID (replace PID with found process ID)

Additional Notes:

Currently there appears to be an issue with pages continuously reloading on Webkit browsers like Chrome and Safari. The good folks at StatusNet have fixed this issue with on their Meteor site at meteor2.identi.ca.  I just pulled down the 4 files located in their public_html folder and replaced mine, adjusting the port in their meteor.js file as mentioned above. ~Lou

Friday, September 3, 2010

RSS echos realtime with dlvr.it

Screen_shot_2010-09-03_at_8

For about 2 years now I have been using Twitterfeed to post my feeds into my StatusNet instance THE HEaRD.  With Twitter, Facebook pages, Buzz and other accounts on these services, getting my content to everywhere was a challenge.  Ping.fm is a great service for allowing to echo to many social networks out there and Twitterfeed would post to that so things seemed fine...for a while.

Twitterfeed started to have issues posting to Ping.fm about 4 months ago and the communication between these two services has yet to be resolved.  I moved my personal feeds to HootSuite, which can post to Ping.FM, but wanted to get back to posting direct to StatusNet again.

Bkja0oc_swh-social-network
Recently it appears that Twitterfeed is having issues posting content whose feeds reside on Feedburner.  Since I post from RSS to StatusNet directly, I am unsure where exactly that issue stems but this has been down for almost 3 weeks now. That was IT!  I pull in about 35 different feeds into an RSS account and this was a HUGE problem and Twitterfeed has been absent at best.  I decided to move on...

Enter, dlvr.it. Dlvr.it (Deliver it) builds upon the same premis as Twitterfeed but I think it takes all the features and reorganizes them for ease of routing RSS feeds to different accounts.  The best part is how you can setup global settings like a preferred URL shortening service and all accounts and feeds can be selected once created for future routes setup.  

Screen_shot_2010-09-03_at_9Screen_shot_2010-09-03_at_9Screen_shot_2010-09-03_at_9Screen_shot_2010-09-03_at_9Screen_shot_2010-09-03_at_9Screen_shot_2010-09-03_at_9

Currently dlvr.it offers posting to the following services:

The support staff (@dlvrit_support) is active on Twitter and they just named a new CEO so it appears this could be a service that is going to have some stiction.  Currently to join you add a feed and connect using OAuth with twitter or facebook but once the account is created, you can remove posting to those accounts if you don't want to use it.  I suggested having OpenID so you could use any provider like Google or even your StatusNet site (if you have the plugin enabled) and they responded via twitter. 

I have had this dialed in for the past few days and all is working wonderfully.  I was not aware of how unreliable Twitterfeed had become now that all is working again.  Twitterfeed was a great service and to their credit, their success has made them grow to a size that reliability has taken a downward turn.  Competition is great for the consumer and this is a perfect example.  Thank you dlvr.it for the great service and keep innovating! ~Lou

Sunday, August 22, 2010

Ubuntu Server Stats with Geektool

This week after playing a bit with Google CL and cURL posting to Twitter and StatusNet, I wanted to go the next step and have a way to keep an eye on my Ubuntu server that runs my StatusNet instance.

On the Mac there is a free tool called GeekTool which is a System Preferences module that allows for some interesting desktop integrations with files, images and shell scripts. There is also an extensive community around this tool where useful scripts have been built for a number of actions.  

Remote Server Stats:
In order to see that basic stats I wanted, I first needed to have a way to display these remote stats locally.  This required me to write a script (serverstats.sh) to ssh to my server and run a simple command on Ubuntu to display the same sysinfo that comes up on a connected session:

/usr/bin/landscape-sysinfo 

The first challenge is to use ssh in a script that doen't contain my password.  Typically an ssh session will prompt you with a password, so to keep the script secure and connect with a script, I need to create a public and private key for the ssh session to use.  To do this, I ran this on my Mac (system to monitor from) in ~/.ssh/:

ssh-keygen -t dsa

This will generate two keys, one public and one private.  The public key will be copied over to the remote server and the contents of the key will be stored in:

~/.ssh/authorized_keys

You can copy the contents running the following:

cat id_dsa.pub >> ~/.ssh/authorized_keys

The the authorized keys must be given access with the following:

chmod 600 ~/.ssh/authorized_keys

*For complete instructions check out: remy sharp's b:log post

Now I can simply ssh and I am into my remote server.  Obviously this would be an issue if my local machine is compromised but I could always revoke the key on the server if that was the case.  For my needs, it seemed to be a calculated risk!

Now I can go back to geek tool and setup my script to run and refresh. I used the Shell Geeklet and in the script area I added this:

#!/bin/bash

echo "THE HEaRD Ubuntu Server Stats:

"

ssh ip-address-of-your-server ./serverstats.sh

I am diggin' Geektool and look forward to doing more script automation in the future. ~Lou
 

Screen_shot_2010-08-22_at_2Screen_shot_2010-08-22_at_2Screen_shot_2010-08-22_at_2


Saturday, August 14, 2010

Posting Tweets via Command Line

After spending some time in the past week updating my Linux server and spending a lot of time in the command line, I wanted to take a look at methods to post to Twitter.  Since there are many parallels in the way you communicate to StatusNet, I decided to play with the options I found for twitter and modify them to post to StatusNet.

The most common method was using cURL, a free, cross-platform, command line utility that is already on most Unix based systems. Once installed you can post using this format:

'curl -u username:password -d status="Rockin' the tweet with cURL" http://twitter.com/statuses/update.xml'

Now that we know the setup you can type in your own "username" and "password" in the script and type your status between the "".  Rudimentary, but you get the idea.  I am no programmer, but I do enjoy taking snippets and adding automation to them, whether that be with an interface or patching piece together to get to the end result.
 
Screen_shot_2010-08-14_at_2
I like the simplicity of a little Mac app called Automator.  It is a way of graphically taking snippets or actions and daisy chaining them together to perform tasks.  I ties into many other applications on the Mac but also can be tied to scripts and other command line tools. 

I added a task to ask for text, which when the app runs it pops up a dialog and then passed it to a shell script task.  In the shell I used the "Pass input as arguments" and typed in my username and password into the cURL script I pasted in.  I replaced the actual post text between the "" with '$@', passing the entered text from the prompt into the script and running it.

I am going to play with a few other ways to automate this but I will leave it as a geek tool and leave the beautiful applications to be built by coders! ~Lou

Screen_shot_2010-08-14_at_2Screen_shot_2010-08-14_at_2

Monday, August 9, 2010

Google Wave WILL LiveOn!

Img_0030

When Google Wave was first revealed at Google I/O 2009, I was anxious to get my ticket into this great new landscape of communication and collaboration. As the preview was rolled out, all us techies were inviting our techie friends so we could test out all the cool things that could be done with the new platform.
For me, the promise was more than just a new way to communicate, it was a look at simplification of my communication. Centralized communication that could be chat, collaboration, email, social interactions and project management, just to name a few. The reason something as old as email works today is that all email is federated. You don't have to be on GMail to get email from someone on GMail. For those of us that remember, this was not always the case. For me, this is the problem with the Internet today. Twitter, Facebook, My Space, LinkedIn, they all require an account to participate. StatusNet is a great example of how federated systems could work for a service like Twitter. Belong to one service and subscribe remotely to users on another network without having to join every network as well.

Img_0031

Back last December 2009, Google opened up federation between Google's Developer's sandbox (wavesandbox.com) which meant anyone could build a Wave server that could federate with the sandbox with an open source project known as FedOne.
After buying a yet another domain, installing an XMPP server (OpenFire, an open source instant messaging server of which brings the dynamic nature of Wave), registering SSL certificates and building the source, I was able to successfully federate with the sandbox as well. (web interface is the Wave Sandbox and the terminal is my Fed One instance)

Img_0032

After Google I/O 2010, FedOne was updated to have a "FedOne Simple Web Client" in addition to the terminal client which again gave the taste of possibility.

Image

I was beside myself when the news came out the Google was going to stop developing Wave as a standalone product: http://googleblog.blogspot.com/2010/08/update-on-google-wave.html
There are about 1M users on Wave and many are disappointed that the development will cease and will only continue running till the end of 2010. There is even a site that has about 20,000 people try to save Wave at http://savegooglewave.com.
The only comfort is that Wave's protocol is open and can be downloaded and built upon at http://waveprotocol.com. I am hoping Google will open source the web interface so more federated services will pop up. There are a number of companies that are using some of these technologies to build collaboration options into their own offerings. As Google has said, Wave taught them a lot and Docs' recent addition of live typing and Google Buzz's threaded comments are signs of adopted technologies. I would love to see the product live on but I will wait to see the fruits of Wave's labor in future products to come. ~Lou

Thursday, August 5, 2010

StatusNet - Powering THE HEaRD

Statusnet-logo

StatusNet, the open source micro blogging ("Twitter-like", with a stress on like) platform has gone though a ton of changes since it's launch in 2008.  I started playing around with the idea in mid 2008 and eventually got my Statusnet (formerly known as Laconica) running in December 2008.  The project is under very active development and was hosted as a community called Identi.ca.  Developer Evan Prodromou, and now CEO of Statusnet created some standards to allow instances of statusnet to talk to one another and subscribe to remote users without having to belong to every community.

The open nature of remote subscription breaks down the "walled garden" of having to belong to every community (i.e. Facebook and Twitter) and communicate openly across the various community lines.  StatusNet has introduced many new technologies that all you to participate anyway you like, whether it is via IM, SMS, Twitter, FaceBook to name a few.  Here is the list of features that is accessible from the help.

I recently upgraded to the most currently build 0.9.3 which added a number of fixes and additional features, one of which is the new StatusNet desktop.  It is limited compared to other clients out there but it is build on open technologies and does not use Adobe Air (YES!).  The feature set is growning and the more communities there are, the more stable it will be! ~Lou

Screen_shot_2010-08-03_at_2Screen_shot_2010-08-05_at_5Screen_shot_2010-08-05_at_5Screen_shot_2010-08-05_at_5

Wednesday, August 4, 2010

Posterous AutoPost to StatusNet

Posterous-logo

The more I play with Posterous, the more features I discover and they really have been rolling out new capabilities over the past couple of months.  Posterous can "Autopost" to many services across the web as you can see below:

Posterous-autopostPosterous-services

Among some of the others I am using like Twitter, I also noticed one with the StatusNet logo under their popular free community Identi.ca, of which I am a member.  I thought at first it was going to just be direct integration with their StatusNet instance but to my surprise it allowed for custom API endpoints to be specified.  This allows many twitter clients and services to talk to a StatusNet install seamlessly.  
Posterous-identica
My community, THE HEaRD, has been running since December 2008 and I am constantly looking for ways to post there.  Here are a few other clients/services that integrate with StatusNet that I use:
  • Ping.FM
  • iPhone Twitter App
  • HootSuite
  • Tweetdeck
  • Twhirl
For a full list of supported services/clients check out the StatusNet site.

Tuesday, August 3, 2010

Ubuntu Server Upgrades Complete.

Ubuntu-logo
I installed my Ubuntu Server back in December of 2008 to run my StatusNet community (formerly known as Laconica), and needed to have a Linux based LAMP stack for a platform.  After hacking together my htaccess file on my hosting site to get clean URLs, I realized that it was going to be impossible to do more sophisticated things down the road.  I opted to go the pure route of setting up my server to be all command line (CLI) as opposed to having a GUI running.  It brings back memories of my days on Unix but this way I could refresh my terminal skills.  

I had 8.10 "Intrepid Ibex" installed since that was the current version at the time and had done numerous upgrades to StatusNet (about 9 versions) but really had not need to think about upgrades to the server itself.  The upgrade from 8.10 to 9.04 "Jaunty Jackalope" went pretty well, completing in just a few minutes.  

Release Update: sudo do-release-upgrade

In this update I noticed that it had messed with my Apache Root Directory settings and had set them to the default of "www" as my root and was not allowing any connections.  A quick tweak to the default config file and my site was back up.

Set Apache Root Directory: Edit the file /etc/apache2/sites-available/default
Reboot Apache: sudo /etc/init.d/apache2 restart 

Once the root was set to the correct directory, "AllowOverride" was set to "all" instead of "none" and a reboot of apache got things back on track.  I didn't notice this to be an issue in the subsequent upgrades from there.  I then proceded to upgrade from 9.04 -> 9.10 "Karmic Koala" and then from 9.10 -> 10.04 LTS "Lucid Lynx.

The upgrade from 9.10 -> 10.04 had a few issues with Java and PHP5 that needed to be fixed.

Java Update in 10.04:

Java apparently had moved from the default repository to the partner repository so I needed to add that repository:

Add partner repository: sudo add-apt-repository “deb http://archive.canonical.com/ lucid partner”
Update source list: sudo apt-get update  
Install Sun Java: sudo apt-get install sun-java6-jre

PHP5 bug in 10.04:

 PHP5 aparently has a bug (#573436) that causes PHP to spew errors even though it seems to work.  The error is: "comments starting with '#' are deprecated in /etc/php5/cli/conf.d/mcrypt.ini on line 1 in unknown on line 0".  This was fixed by replacing the "#" with a ";" so the forums came though with a fix:

PHP fix:  
cd /etc/php5/cli/conf.d 
sudo perl -pi.bk -e 's/(s*)#/1;/' *ini 
sudo mkdir bk 
sudo mv *.bk bk

The got things up and running and despite the few glitches I ran into, I cannot imagine that an upgrade like this on Windows Server would have taken me a week and not an hour or so. Long live open source! ~Lou

Time Stamps in Notepad

This is a great little tip for those of you that use Notepad to keep simple notes and want to add a time stamp.  This can be done as an automated function by simply adding ".LOG" and hitting Enter on the first line of a blank Notepad document and saving it.  Upon open, Notepad will enter a date in the form "8:49 AM 8/3/2010" and you can continue with your note taking glory!  

Now close your note and reopen, you will see that Notepad has now added another time stamp and you are logging your entries.  If you don't want this automated you can simply hit "F5" and that will manually drop a time stamp where your cursor is in the document.
If you want to "graduate" up to a more sophisticated notepad app, try out NotePad++, which is a free and open source notepad app for the power user.  It supports multiple tabs, formatting for coding, HTML and extensibility with plugins and more.  I like that it is extremely lightweight and is great for the local system. ~Lou

Screen_shot_2010-08-03_at_8Screen_shot_2010-08-03_at_8Screen_shot_2010-08-03_at_8